Use hostnamectl
https://www.cyberciti.biz/faq/how-to-change-hostname-on-debian-10-linux/
Use hostnamectl
https://www.cyberciti.biz/faq/how-to-change-hostname-on-debian-10-linux/
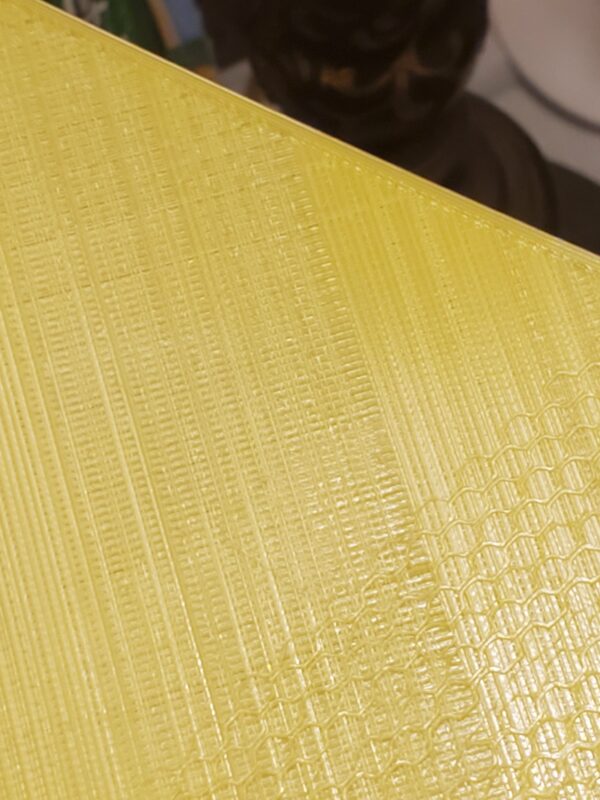
I need to apologize to a filament manufacturer for blaming their filament. Turns out my stock CR-6 extruder wasn’t extruding as consistently as it once was. I took it apart and and upon closer examination demonstrated that the gears were full of ground up filament. and the spring wasn’t taught as it once was. Having removed the ground up filament, and trying some reliable filament (thank you atomic filament I love your stuff). http://www.atomicfilament.com
It may be hard to see but some of the lines are barely even there. It was not consistent; If I pushed on the filament with my fingers and force fed it into the extruder, I could get consistent lines, but stock was not gripping the filament anymore.
During the kickstarter I did order a replacement extruder because I thought the design was novel. But now that I’ve got a couple hundred hours printed on this thing. It just doesn’t feel as durable as I hoped it would. There’s no real way to adjust the tension of the spring, and i’ve struggled getting filament to feed through it on occasion.
I’ve really been spoiled with my Micro Swiss direct drive on my CR-10S, that has hobbed gears that look like it could feed anything down to the hot end. In the end I’ve ordered a new extruder instead of going down the CR6 extruder again.
This is what I ended up getting
Upgraded Creality Ender 3 All Metal MK-8 Extruder Feeder Drive1.75mm Filament for Ender 3 Pro/3V2/5/5 Plus/Pro, CR-10 Series, CR-10S, CR 20/20 Pro 3D Printer, Gray Aluminum Block Bowden Extruder https://www.amazon.com/dp/B07WHYBVJ5/ref=cm_sw_em_r_mt_dp_fmGQFbPB9D545
My 2yo Loves Loves Loves Scooby-Doo. Sooo… That’s what we dressed up like this year.


firewall {
    all-ping enable
    broadcast-ping disable
    ipv6-receive-redirects disable
    ipv6-src-route disable
    ip-src-route disable
    log-martians enable
    name WAN_IN {
        default-action drop
        description "WAN to Internal"
        enable-default-log
        rule 1 {
            action accept
            description "Allow established/related"
            log disable
            state {
                established enable
                related enable
            }
        }
        rule 2 {
            action drop
            description "Drop invalid state"
            log enable
            state {
                invalid enable
            }
        }
    }
    name WAN_LOCAL {
        default-action drop
        description "WAN to Router"
        enable-default-log
        rule 1 {
            action accept
            description "Allow established/related"
            log disable
            state {
                established enable
                related enable
            }
        }
        rule 2 {
            action drop
            description "Drop invalid state"
            log enable
            state {
                invalid enable
            }
        }
    }
    options {
        mss-clamp {
            interface-type all
            mss 1460
        }
    }
    receive-redirects disable
    send-redirects enable
    source-validation disable
    syn-cookies enable
}
interfaces {
    ethernet eth0 {
        address 192.168.0.1/24
        description "Local Config Port"
        duplex auto
        poe {
            output off
        }
        speed auto
    }
    ethernet eth1 {
        description "Google Fiber Jack"
        duplex auto
        poe {
            output 48v
        }
        speed auto
        vif 2 {
            address dhcp
            address dhcpv6
            description "Google Fiber WAN"
            egress-qos 0:3
            firewall {
                in {
                    name WAN_IN
                }
                local {
                    name WAN_LOCAL
                }
            }
        }
    }
    ethernet eth2 {
        description "LAN 0"
        duplex auto
        poe {
            output off
        }
        speed auto
    }
    ethernet eth3 {
        description "LAN 1"
        duplex auto
        poe {
            output off
        }
        speed auto
    }
    ethernet eth4 {
        description "LAN 2"
        duplex auto
        poe {
            output off
        }
        speed auto
    }
    loopback lo {
    }
    switch switch0 {
        address 10.1.0.1/24
        description "LAN Switch"
        mtu 1500
        switch-port {
            interface eth2
            interface eth3
            interface eth4
        }
    }
}
port-forward {
    auto-firewall enable
    hairpin-nat enable
    lan-interface switch0
    wan-interface eth1.2
}
service {
    dhcp-server {
        disabled false
        hostfile-update enable
        shared-network-name LAN {
            authoritative disable
            subnet 10.1.0.0/24 {
                default-router 10.1.0.1
                dns-server 10.1.0.1
                lease 86400
                start 10.1.0.101 {
                    stop 10.1.0.254
                }
            }
        }
    }
    dns {
        forwarding {
            cache-size 1000
            listen-on switch0
            name-server 2001:4860:4860::8888
            name-server 2001:4860:4860::8844
            name-server 8.8.8.8
            name-server 8.8.4.4
        }
    }
    gui {
        https-port 443
    }
    nat {
        rule 5000 {
            description "Masquerade for WAN"
            log disable
            outbound-interface eth1.2
            protocol all
            type masquerade
        }
    }
    ssh {
        port 22
        protocol-version v2
    }
    upnp2 {
        listen-on switch0
        nat-pmp disable
        secure-mode disable
        wan eth1.2
    }
}
system {
    host-name edgy-loop
    login {
        user ubnt {
            authentication {
                encrypted-password $1$zKNoUbAo$gomzUbYvgyUMcD436Wo66.
                plaintext-password ""
            }
            level admin
        }
    }
    name-server 2001:4860:4860::8888
    name-server 2001:4860:4860::8844
    name-server 8.8.8.8
    name-server 8.8.4.4
    ntp {
        server 0.ubnt.pool.ntp.org {
        }
        server 1.ubnt.pool.ntp.org {
        }
        server 2.ubnt.pool.ntp.org {
        }
        server 3.ubnt.pool.ntp.org {
        }
    }
    offload {
        ipsec enable
        ipv4 {
            forwarding enable
            vlan enable
        }
        ipv6 {
            forwarding disable
        }
    }
    syslog {
        global {
            facility all {
                level notice
            }
            facility protocols {
                level debug
            }
        }
    }
    time-zone America/Chicago
}
Two Factor Authentication is a lofty goal for any linux administrator. If you’re lucky enough to have access to an NetIQ eDirectory server, hardware based two factor authentication is closer than you think.
Tutorial on how to use SSSD (pronounced Triple “S” D) as a cross Linux platform (RHEL, SLES, Ubuntu, et. al) authentication agent instead of painful and often times disparate pam_ldap and sudoers configurations. Centralized user and group management using existing directory infrastructure. Learn how centrally store SSH key and sudoer configurations in LDAP. No more having to copy your SSH key to each new server. Create a SSH Key based single sign on solution. Your sudo commands are authenticated against your Directory. Expand the configuration of SSSD clients for 2 factor authentication using a HOTP configured YubiKey that does not require any changes on the authenticating client. Integration with eDirectory. Explore SSO Kerberized options with Active Directory and MIT Kerberos.
openssl s_client -connect 192.168.211.21:636 \
< /dev/null 2>/dev/null \
| openssl x509 -text -in /dev/stdin
Welcome to WordPress. This is your first post. Edit or delete it, then start blogging!
Lorem ipsum dolor sit amet, consectetuer adipiscing elit, sed diam nonummy nibh euismod tincidunt ut laoreet dolore magna aliquam erat volutpat.
Lorem ipsum dolor sit amet, consectetuer adipiscing elit, sed diam nonummy nibh euismod tincidunt ut laoreet dolore magna aliquam erat volutpat.
Lorem ipsum dolor sit amet, consectetuer adipiscing elit, sed diam nonummy nibh euismod tincidunt ut laoreet dolore magna aliquam erat volutpat.Lorem ipsum dolor sit amet, consectetuer adipiscing elit, sed diam nonummy nibh euismod tincidunt ut laoreet dolore magna aliquam erat volutpat.
Lorem ipsum dolor sit amet, consectetur adipiscing elit. In sed vulputate massa. Fusce ante magna, iaculis ut purus ut, facilisis ultrices nibh. Quisque commodo nunc eget tortor dapibus, et tristique magna convallis. Phasellus egestas nunc eu venenatis vehicula. Phasellus et magna nulla. Proin ante nunc, mollis a lectus ac, volutpat placerat ante. Vestibulum sit amet magna sit amet nunc faucibus mollis. Aliquam vel lacinia purus, id tristique ipsum. Quisque vitae nibh ut libero vulputate ornare quis in risus. Nam sodales justo orci, a bibendum risus tincidunt id. Etiam hendrerit, metus in volutpat tempus, neque libero viverra lorem, ac tristique orci augue eu metus. Aenean elementum nisi vitae justo adipiscing gravida sit amet et risus. Suspendisse dapibus elementum quam, vel semper mi tempus ac.
Lorem ipsum dolor sit amet, consectetuer adipiscing elit, sed diam nonummy nibh euismod tincidunt ut laoreet dolore magna aliquam erat volutpat.Typi non habent claritatem insitam; est usus legentis in iis qui facit eorum claritatem. Investigationes demonstraverunt lectores legere me lius quod ii legunt saepius. Claritas est etiam processus dynamicus
Typi non habent claritatem insitam; est usus legentis in iis qui facit eorum claritatem. Investigationes demonstraverunt lectores legere me lius quod ii legunt saepius. Claritas est etiam processus dynamicus